Ian-C outlines the construction and preparation of his garage in preparation for his Pilgrim Sumo Build.
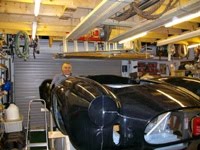
With the approach of retirement Barbara was keen to move from the large family home in to a smaller house, hopefully a bungalow, to make maintenance easier. She had numerous criteria and factors to use in selecting possible properties, I had only one – a large garage or space to build one. My plan was to import an original Austin Healey 3000 from the States and renovate it. We found a bungalow that fitted all of our criteria in 2000 but the garage was delayed by unexpected redundancy and other domestic jobs that needed doing. The existing garage is shown below:

We (I) eventually started the garage project in November 2005, I had specified an inspection pit as one of the primary aims to the obvious discomfort of the builders who had no experience of such constructions.


To cut a long story short the garage went up quickly and very satisfactorily but the pit stumbled from one crisis to another. Brunton Park, where we live is known for its clay subsoil and this was revealed when the hole for the pit flooded to a depth of about a metre within a few days of excavation. The builders were unhappy to proceed and the local planners suddenly became interested. I pressed the issue and with the help of my son Daniel (who is also mad on cars and was the only one to support my dream of having a pit) is an architect and had drawn up the plans and was helping with project managing the build. We did research and were sure that with the proper damp proof membrane and construction the pit would be watertight.
I drained the pit and installed a sump hole and pump to keep it dry prior to laying the floor and building the walls. Everything looked good and the pit was finished before the first sign of water ingress appeared and within a few days the water in the pit was 100 – 120mm deep. It would appear that the membrane had been punctured, probably on the ends of the reinforcing mesh in the floor. “Told you so” everyone seemed to be saying – or was that my paranoia. The water level stabilised at the 100mm level and I tried to ignore it while I pressed on with installing roller doors and the fit out.

Being able to ignore it no longer I inevitably turned to the web for help – what did we do before the web?!! – and quickly found tanking products “claimed” to be able to withstand positive water pressure and able to set in the presence of, and even under, water. I used Weber Motex dryrend cementatious tanking mortar, after bailing out the pit, and was immensely relieved when the pit stayed dry.

After leaving the pit for a month to confirm that the tanking had cured the problem I completed the painting and installation of power to complete (as I thought) the pit.

.jpg)
The main garage was also slowly painted (the aim being to reduce the potential for dust to keep open the possibility of painting the car at some point in the future) and fitted out with benches, lighting and (most importantly) a good sound system.


The first jobs to be carried out in the “new” garage were the stripping and cleaning of a Rover V8 3.9 EFi engine purchased for the car and various maintenance and repairs to my sons’ cars (Audi TT and Alfa 146). The repair to my younger son’s Alfa was the first to use the pit. The pit had been planned when I was hoping to restore an Austin Healey 3000 and the size and position were based on this premise. I had overlaid the plans for the garage with a scaled plan of a Healey to check track and size and making sure that access was available to both front and back mechanicals with the car over the pit.
The first use with the Alfa revealed a basic and obvious (in hindsight) flaw – with the car central over the pit there was no way you could get down into the pit, OH S*%T. I don’t believe it (as Victor would say and I said endlessly), how had such a basic error been possible with all the thought and planning. The pit could be used if the car was not placed fully over the pit but this meant that either the front or the back, depending which way it had been driven over the pit, was sticking out past the roller door which in turn meant the door could not be closed. This was not a tenable position and I determined that modifications would be needed, the pit had also developed a very small leak – more of a weep than a leak, that I planned to fix at the same time.
The plan I came up with was to cut steps into the end of the pit at the rear which would allow access under the front of the car when over the pit with the door closed. This plan was deemed to be unnecessary and a waste of time by Barbara and impossible by Daniel – never the less. After the first two days work which saw the removal of approximately one half of one of the dense concrete blocks used to build the pit I was starting to regret my impetuosity.

I had erected a makeshift tent over the end of the pit in an attempt to keep the dust contained, it worked, after a fashion, but made the work incredibly hot and dusty.

I progressed from lump hammer and cold chisels to the faithful De-Walt hammer drill but was still making very slow progress.

Looking for alternatives I stumbled upon the electric Jack Hammer and hired one from the local tool hire company – what a turn round and such great fun, the ultimate boys’ toy.

The remaining blocks and section of concrete floor were rapidly removed and the rest, as they say, was easy. I then turned my attention to the very small weep that was coming through what had the appearance of a pin hole near the end where I had cut the steps. I purchased some more tanking mortar and proceeded to cut round the pin hole with a diamond cutting wheel in the angle grinder with a view to chiselling off the old mortar and replacing it. I bet you are ahead of me because it is so obvious in hindsight – the pin hole in the tanking mortar was effectively holding back the water pressure the way that a tap with a leaking washer would hold back the cold water pressure in a domestic tap. As soon as I had completed the cuts it was as if I had turned on a tap, I just knelt there thinking (not for the first time) OH S*%T, what have I done. The flood showed no sign of abating despite desperate attempts to emulate the little Dutch boy and eventually I climbed out of the pit thoroughly humbled and defeated.
I went back the next day to survey the scene, the pit was approximately 50mm deep in water but on checking over a couple of days the water level was stable. I assumed that the initial water pressure was due to the fabric of the pit being totally saturated resulting in the flow of water through the enlarged hole and that now this stored water had dissipated the flow would be greatly reduced. Buoyed up by this revelation I determined to press on with the repair. Once again I bailed out the pit and applied mortar to the exposed area only to find it being washed off by the flow, even though it was much reduced back to nearly the former level. I managed to construct a beam and wedge to push some laminate against the mortar and hold it in place while it set. This worked a treat and a second layer was applied once it had set. DONE.

I then completed the pit, for the second time by painting it and the boards used to cover it when not in use.

I stood back to survey the results of my labour and slowly realised that the rest of the garage, previously looking like a place where you would be happy to construct a kit car, now looked like a building site – and a derelict one at that! The make shift tent had been ditched when I got the man sized jack hammer and never been replaced when I did the final cutting with the diamond wheel cutter. You must have seen the amount of concrete dust these things kick out when cutting paving stones and the like – well, that is what I was doing in the previously “finished” garage. Suffice it to say that the next month was spent taking everything out of the garage, vacuuming and cleaning it before return. I also had to vacuum and repaint the floor and some of the walls. I am happy to report that the construction of the work area is now complete and awaiting the kit.

Somehow I think that my experience with the garage may be the ideal preparation for building a kit car although I hope not.
Thanks for the article Ian, looks like the days of scrubbing around on our backs under our cars our over!!


 It was something that I intended to alter during my build and the plans varied from cutting the whole top from the transmission tunnel and lowering it, raising the rear of the tunnel to effectively lower the handbrake to putting spacers on the mounting bolts to alter the angle of the lever. As I am planning to paint the chassis I realised that I would have to make any alterations first.

 I then cut out the parts for the housing, using the Visio printouts for templates, from 1.2 mm steel (display rack shelves salvaged years ago with the knowledge that one day they would prove useful!). The shelves had been coated or enamelled which proved difficult to remove where I was welding up the box but did provide good protection elsewhere. The folds were made in the vice and a bit of “adjustment was required to get the correct fit.
  The parts were then welded up to form the housing after much practice with scrap bits of metal to get the settings right. The welds seem OK but would not win any prizes. I test fitted the box into the chassis and decided to reinforce the housing with additional cross braces at the front and back across the full width of the tunnel. These were cut, formed and welded and test fitted to ensure they provided the planned support.
 All the brackets were then cleaned up with the angle grinder, my new favourite tool, and given a coat of anti rust primer before fitting.
  Owing to the fact that I did not want to rely overmuch on my welding I decided on a belt, braces and elasticated waistband approach and pop-riveted, welded and bolted the housing into the chassis. The whole assembly was then given a coat of anti rust primer paying special attention to the underneath. When dry I bolted in the handbrake and the result was pleasing to my eye.
 First job done only another ???? to go.